I don’t know about you, but I am a hoarder of all things pantry related. I hate throwing out spices, baking supplies, oils, etc. When I went to reorganize my pantry this weekend, I knew I would have to get rid of some things … but I also knew I would be able to make it look all pretty again!
My all for all things pretty may outweigh my love for a well stocked pantry.
If you were to have a look at my pantry now, you would likely say “did you even get rid of anything?” Indeed, I did! But still it shows that as a household of one I still hoard way too many pantry essentials 🙂
Anyway. I put all my baking supplies in pretty canisters. This is quite the step up from the oh-so-sophisticated plastic bags they came in. I wanted to figure out a way to label them that was a) easily removed and b) easily changed. So, I went off to Target in search of an idea.
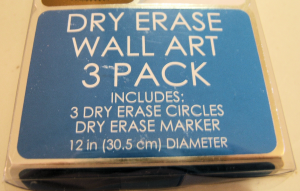
I knew I didn’t want to buy regular mailing labels. Because, well, BORING, and also I hate trying to remove those things. Then I remembered that there are companies that make dry erase sheets and I thought I could somehow do something with that — though I wasn’t even sure if Target carried them. Well, they do! They carry some dry erase sheets in blue, green, and pink. They are cut into circles and shown used on walls, but I knew I could use them for my canisters. So this is what I did.
The Dry Erase pack comes with 3 circles and a dry erase marker. The dry erase marker was no good — the ink was way too light to even be seen. So if you have some other markers to use, go ahead and grab them. (Or grab every single dry erase marker that’s in your house, like I did. Whatev.)
Once you take the circles out of the package, they’re going to be all folded and wonky. I placed mine under a heavy basket for a while so they would lay flat, then I got to work.
First, I cut a large square from the circle by simply cutting off the rounded edges.
Then I cut this piece into 4 equal(ish) squares. I say equalish because I didn’t actually measure. Just eyeballed it. I like to live on the edge, you know.
Now, as your eyes try to adjust to the blurriness that is that picture (sorry), you’re ready to move on to the next step!
I had 11 canisters I wanted to label, so I pulled all of them out. For some, I adhered the label to the canister and wrote the contents while the label was on it. For others, I wrote on the label and then adhered it. Whatever method is easier for you!
So, I peeled off the back of my first label and excitedly placed it on my canister full of light brown sugar.
Next, I took my blue dry erase marker and wrote on the label. And whenever I messed up, I just erased it and wrote again! GENIUS.
(Again I apologize for the shaky picture. Clearly I will be the winner of the “Shakiest Photographer of the Year” Award.)
The best part of this labeling system is the dry erase aspect. The worst part of this labeling system? The dry erase aspect. Perhaps as the labels sit the marker will be harder to remove. But, I would be careful about touching the label and be aware of where the label hits. And you can always just rewrite it as needed.
But really. My pantry is so pretty now, I could really care less about the chance of erasure.
(Insert sigh of organizational content here)


I really like that idea for my new pantry!!
*Tiffany*
I blog over at http://itsacowgirlthing.blogspot.com